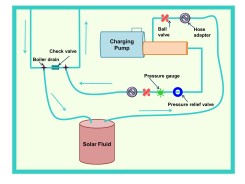
Before you can use a pressurized solar thermal system, you need to "charge" it with solar fluid (usually an antifreeze mixture of glycol and water) so that it has a heat transfer medium. There are three steps to the charging process:
- Pumping the solar fluid in (this page).
- Getting the air out.
- Pressurizing the system.
Make sure you read and understand all three stages before starting the charging process.
CAUTION: You must cover the solar collectors when charging the system! Uncovered collectors will heat the fluid to extremely high temperatures which can cause steam venting and serious injury.
This is not optional: protect yourself. Cover the collectors.
Tools you will need
- A charging pump – choose a booster pump powerful enough to push the solar fluid to the highest vertical point in the system. A 1.5hp jet pump is usually sufficient as it can pump over 40 feet vertically and is inexpensive. Make sure you attach male hose connectors (NPT) to the inlet and outlet. You may also need a hex bushing.
- A copper charging tube – this is a short length of copper pipe with a check valve, a ball valve, a pressure gauge and a pressure relief valve installed on it. Connect one end to the outlet of the charging pump and fit the other end with a male hose connector. You will use this tube to control and monitor the three charging stages.
- Your solar fluid mix (usually propylene glycol and water) in pails or other open containers.
- A four-foot hose with female connectors at both ends.
- Two other hoses (each 4 feet long) with a female connector at one end.
- A 5-gallon pail.
- Channel-lock pliers.
- Rags, gloves and a flashlight.
 Pumping in solar fluid
- Place the pump and pail near the charging ports (the two boiler drains with the check or ball valve between them).
- Connect the copper charging tube to the inlet of the solar loop (the port the boiler check valve points to) and fully open the valve.
- Connect one of your two other hoses to the outlet of the solar loop (the drain valve before the check valve) and lay the open end in the empty pail. This tube must reach the bottom of the pail.
- Connect the final tube to the inlet of the charging pump and lay the open end in the empty pail. As with the other hose, this one must reach the bottom of the pail.
- Make sure any ball valves in your solar thermal system are fully open.
- Make sure you can see the pressure gauge (or have someone stand by it and call out values).
- Make sure you can reach the pails of antifreeze solar fluid mix and the valves on the boiler from the location of the charging pail (the empty one).
- Verify that your charging setup matches the diagram on this page.
- Fill the pail with your antifreeze glycol mix.
- If your pump does not self-prime, detach the outlet hose, fill the pump with solar fluid and reattach the hose.
- Tighten all connections with the pliers.